 Resources
Recommended Sites

Mission Model Building Tips
Here are some general ideas shared by members of the FLL: Share & Learn group.
Mission Model Building
Your tips specific to SUPERPOWERED, download the Mission Model Building Guide here .
1) Begin by sorting the bags in your box by bag number. There will also be several unnumbered bags. Check to see that you have the right number of bags. Usually someone in Share & Learn will make a post with the number of bags. In addition there should be a sheet of 3M dual-lock (velcro) at the very bottom of the cardboard box. Also look for loose, un-bagged LEGO at the bottom of the box.
2) Empty the parts out so you can see them. It is hard finding parts in a bag as you build. If you sort the parts first into type of element (axles, pins, etc), you will save some time trying to find them. You can use the sorting tray inside the robot set, paper plates, small bowls, box lids, cafeteria trays, dollar store cookie sheet, etc. Be creative and use whatever you have.
3) Parts tend to roll off the table. Adding a tea towel of using a felt-backed vinyl tablecloth will prevent parts from rolling off the table.
4) Building in pairs or small groups works well. One person finds the parts for the step, one person puts the pieces together, and one person checks to make sure the step was done correctly. Change roles every few steps.
5) One Bag can produce multiple mission models in some years. So each sub-group might end up making more than one model.
6) Some models and bag numbers take a lot longer to complete than others. You can check ahead and see how many step numbers there are and even switch who builds that bag half way to distribute the load evenly.
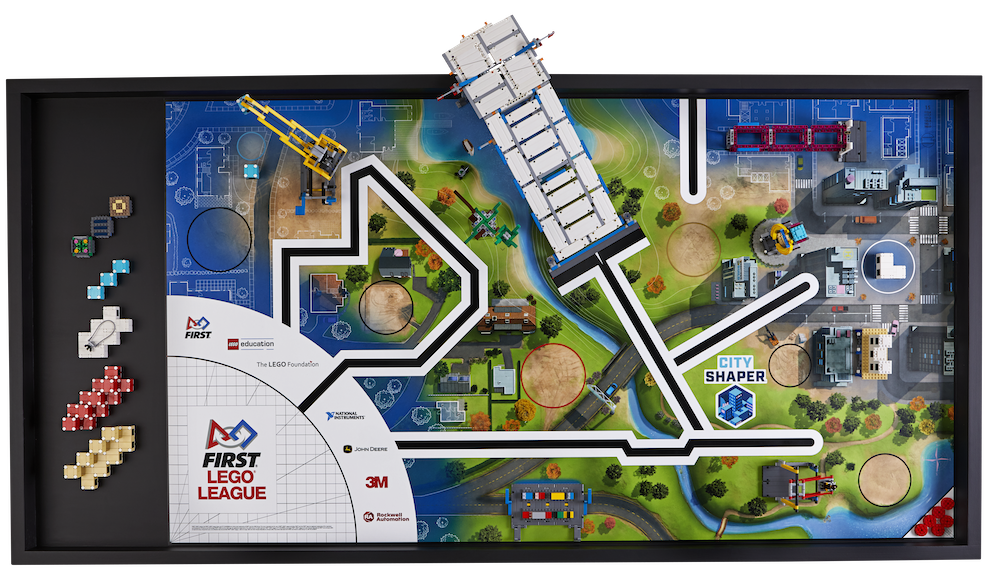
7) You might build something in a bag and it won’t get used until another model. For example in CITY SHAPER, you build a partial bridge in Bag 1. This gets combined with the rest of the bridge that is built in Bag 2’s instruction booklet.
8) Larger elements such as hoses and 15 length beams are not in the number bags. They are found in unnumbered bags. Therefore, if you are trying to presort by mission model so that a student can take elements home and build, be sure you look for all the larger items in the unnumbered bags or even loose in the box (e.g. long axles are not in any bag).
9) There are always some leftovers. They tend to be smaller elements usually.
10) Sometimes, there are no build instructions. The bags with white brick are used in M01 in the robot game. Check the Robot Game Rulebook for instructions on what to build. Some years, there are other open-ended activities that require additional LEGO and no instructions are provided for those bags. In SUPERPOWERED, students can decorate a white panel on one of the missions using the provided LEGO dots. This is an optional activity and no build instructions are given.
11) Be sure to pay attention to the multiplier symbols (e.g. X2, X5) symbols on a page. You can construct them at the same time. The only exception to this is the bridge model. Step 103 of Book 2 indicates a X2. You cannot build two bridges with one set. This is just for tournament organizers or those with two tables.
12) If you are missing items, check the bags, check the ground, check to see that the element was not used earlier in another step by mistake. Check the box for dual lock. Check the unnumbered bags. All large elements are only in the unnumbered bags. If you can’t find it, call LEGO for help: 1-800-422-5346 in the USA.
13) Always build exactly what the instructions tell you. Do not improvise or improve the model. Your model must look like and behave exactly the same way the ones at the competition will. Have your coach or adult check the build or compare with another team’s set if needed.
14) Place finished models loosely on the challenge mat. Be sure to follow the text and images in the Field Setup section of the Game guide very carefully. They will tell you which way a model should face. In addition, use the markings on the challenge mat itself as alignment points. If it doesn’t align, it could be an indication of something wrong with the build itself.
15) Once everything looks correct, follow the set-up instructions to place the dual lock on the Challenge mat and press the models down in place.
16) If you need to pack up and put away your challenge set, the models are very durable. Just separate the dual-lock where they meet.